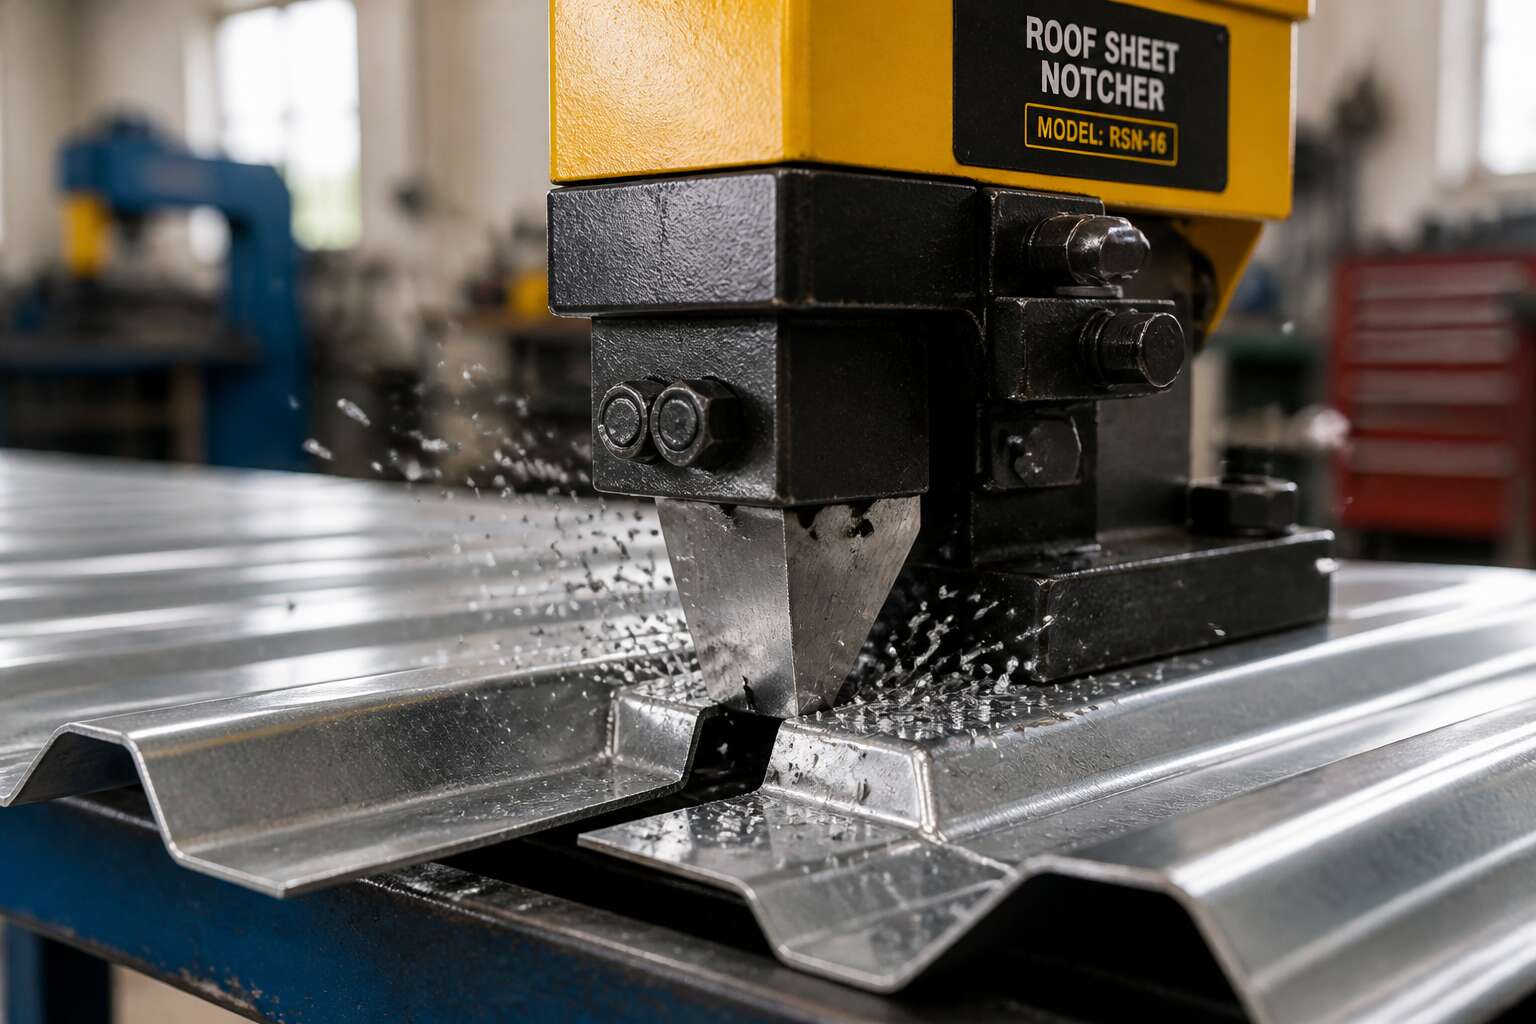
The Essential Role of a Notching Tool in Roofing
Why Precision Notches Matter for Roofing Panels
South African roofs endure UV rays and heavy downpours. A roof sheet notcher with exact blade alignment stops panels from warping at the corners. Precision notches matter because they keep the profile flat and the seams tight. In my experience, a 2 mm mistake on site leads to visible buckling and water pooling.
The key benefits of accurate notching include:
- maintaining the sheet’s structural rib profile
- creating flush overlaps that resist wind uplift
- minimizing the use of mastic and fasteners
A notching tool defines the edge geometry. When the notch is clean, each panel locks into position with no hammering. Contractors who ignore this end up patching leaks within two seasons. The right tool turns a corrugated roof into a long term investment.
Common Obstructions That Require Notching
Every roof has a weak point where obstructions break the line. A chimney, a vent stack, a valley junction. In South Africa, these penetrations are common. A roof sheet notcher turns a full sheet into a precise fit around each one.
- vent pipes and exhaust flues
- parapet caps and wall flashings
- valleys and hip intersections
Without the notch, the sheet refuses to lie flat. The tool cuts cleanly around the obstruction while keeping the profile intact. I have watched crews lose an afternoon hammering a sheet to conform. A nibbler leaves ragged edges that tear in the wind. The notcher shears the corner in one clean motion. I have seen installers clear a vent pipe in under a minute! A roof sheet notcher removes that fight.
How Notching Improves Installation Speed and Weatherproofing
A roof sheet notcher does more than trim metal. It shortens the time between measuring and fixing. The tool reduces a twenty minute struggle with snips and a hammer to a single pull of the lever. The sheet arrives at the obstruction already shaped, so the crew moves forward without stopping.
Weatherproofing improves because the notch is clean and accurate. A hand cut edge bends, cracks, or leaves a gap for water to creep behind. The notcher shears the profile at the exact line, preserving the sheet’s factory coating. That sealed edge means no exposed steel, no rust streaks.
The advantage is how it changes the workflow:
- Cut the corner in one motion
- Align the sheet directly onto the purlin
- Fasten without reworking
Each roof sheet notcher cuts a corner, saving minutes off the schedule and closing the roof faster, which matters when a South African thunderstorm builds before lunch.
Types of Notching Machines and Their Applications
Manual vs. Pneumatic vs. Electric Notchers
Walk onto any roofing site and the notching machines tell you who’s in charge. Manual notchers suit tight budgets and occasional cuts. Pneumatic models thrive where compressed air is already available. Electric versions deliver steady speed for production lines. Choosing a roof sheet notcher means matching its power source to your setup.
- Manual: Portable and affordable, though requires more physical effort.
- Pneumatic: Quick and consistent, but needs a compressor nearby.
- Electric: Reliable for ongoing use, especially on thicker panels.
Each type changes your workflow, and the wrong selection will cost you both time and patience.
Notching Capacity and Sheet Thickness Considerations
Beyond the power source, notchers split into throat depth and blade geometry. A 150mm throat handles standard roof sheeting, while deeper throats reach into box profile valleys. For corrugated iron, a flat blade works fine. For trapezoidal panels, you need a matching die set. The application dictates which configuration you should buy, and a portable unit suits on-site trimming better than a fixed bench model.
Capacity and sheet thickness go hand in hand. A 1.2mm mild steel limit covers most South African roof sheets, but heavier gauge profiles demand a beefier machine. Consider the material’s tensile strength, not just its thickness.
- 0.5mm to 0.8mm: light gauge, common for residential
- 0.9mm to 1.2mm: standard industrial sheeting
- Above 1.2mm: specialist notchers required
Choosing the right roof sheet notcher means checking the sheet’s yield strength. A roof sheet notcher rated for 1.5mm mild steel may struggle with 1.2mm high tensile steel. Always verify the manufacturer’s spec against your actual panel profile.
Portable Handheld Notchers for On-Site Work
Nobody enjoys wrestling a full sheet of IBR down a ladder for a bench trim. That is the fast route to a bent panel and a bruised ego. The portable handheld notcher exists to spare you that ritual, and South African roofers have embraced it accordingly.
Where a fixed bench model demands you bring the sheet to the machine, a roof sheet notcher with a pistol grip goes where the work is. Perched on a roof pitch or balanced on scaffolding, you cut the notch at the point of installation. That removes the back and forth, the re-measuring, and the moment where the sheet no longer lines up.
Portable units do ask for compromises:
– Throat depth shrinks on handheld models
– Blade geometry must match the panel profile
– Weight matters when you work overhead all day
The everyday corrugated profile on a suburban roof does not need a machine built for architectural zinc. Match the purchase to the panels you actually trim.
Bench-Mounted Notchers for Workshop Fabrication
A bench mounted roof sheet notcher operates on a different principle. The sheet travels to the machine, which changes the entire rhythm of fabrication. You stand in one place, feed the panel, and let the fixed tooling do the thinking.
With a fixed throat and a foot operated clamp, an operator registers each panel against the same stop. The notch lands in the same place every time. This consistency proves essential for production runs of identical flashing or custom IBR profiles.
- Larger throat depth handles wider panels
- Heavier frames absorb vibration
- Interchangeable dies match different corrugations
South African fabricators rely on this setup for batch work where handheld units introduce drift and inconsistency. The roof sheet notcher becomes the quiet centre of the workshop, turning repetitive trimming into mechanical certainty.
Step-by-Step Guide for Accurate Notching
Measuring and Marking the Notch Locations
A 2 mm error on a roof sheet notcher becomes a 20 mm gap across the panel run. Measuring and marking demand patience. Start by confirming the exact obstruction position on the purlin or flashing, using a tape measure from a fixed datum point. Transfer that dimension onto the sheet’s underside with a sharp scriber, never a permanent marker that bleeds.
For a clean transfer, follow this sequence:
- Measure the obstruction width and depth.
- Mark both edges with a square.
- Double check against the installed profile.
Always work from the same reference edge each time. If you flip the sheet, the notch mirrors and ruins the fit. Test the marking on a scrap piece first, especially for complex penetrations. A roof sheet notcher cuts fast, so accurate marks are the only safety net. Recheck each dimension before pulling the lever, because a misplaced notch wastes material and costs a return trip.
Setting Up the Notcher for Clean Cuts
Setting up a roof sheet notcher demands attention. The blade gap and die alignment determine whether the cut shears smoothly or tears the coating. I set the depth stop first, so the punch never cuts deeper than the sheet’s thickness. A half turn too far and the edge curls!
- Lock the base plate to a stable surface
- Confirm the punch and die are free of burrs
- Adjust the throat clearance to match the material gauge
Run a scrap piece through before touching the panel. The first cut reveals if the blade strikes evenly across the full width. If one corner drags, the notch will show it. A notcher that sits crooked on the bench produces crooked work. Check the spirit level across the bed. Once the tool is set, the marking from earlier becomes a mechanical act.
Executing the Cut with Controlled Force
The punch meets the metal with a sound that tells you everything. A clean notch rings sharp. A struggling cut groans. That distinction matters when each panel carries the weight of an installation.
I position the sheet against the back gauge, fingers clear of the throat. The first squeeze should be deliberate, not forceful. Let the machine do the work! Too much pressure distorts the edge and strains the mechanism.
For a roof sheet notcher, the rhythm of execution is simple:
- Align the marked line with the die edge.
- Lower the handle steadily until the punch pierces the sheet.
- Release and check the notch for burrs before moving on.
Controlled force means letting the blade shear at its own pace. Rushing creates chatter marks. Hesitating leaves a partial cut. The right amount of force comes with practice. Once you feel it, every notch follows that confidence.
Deburring and Finishing the Notched Edges
The cut has been made, and the metal has surrendered to the die. But the work is not finished. A sharp edge, fresh from the punch, will betray you later in the form of a torn glove or a rust line. Deburring is the quiet ceremony that separates a professional from a mere enthusiast.
A simple deburring tool, drawn along the edge at a consistent angle, will remove the microscopic ridges left behind. Work methodically along each side of the notch. The goal is a smooth, uniform edge that will sit flush against the adjoining panel.
– Inspect the cut edge for any remaining burrs.
– Run the deburring tool along the entire length of the cut.
– Wipe the edge with a clean cloth to remove metal filings.
– Apply a light coat of anti-rust spray to the exposed metal.
Once the edge is smooth, consider the finish. A bare cut edge is vulnerable to corrosion, especially in coastal South African climates. A quick pass with a sealant or primer protects the integrity of the panel. This step adds a minute to the process and years to the installation. The satisfaction of a clean, finished notch is the final confirmation that your roof sheet notcher has done its job properly.
Verifying Fit and Making Adjustments
A gap of two millimetres at the corner of a notch becomes a twenty centimetre stain on a ceiling within a season. The cut is made, the edge refined, yet the work remains unfinished. The panel must be offered up to the obstruction, pressed into place, and inspected for any gap or resistance. A roof sheet notcher that produced a perfect square on the bench may still fail against an uneven wall profile.
I check the fit from both ends. Look for gaps along the top edge. If the notch sits too tight, widen it by a single increment. If it hangs loose, the mark was misplaced. Adjust the stop or depth setting on the roof sheet notcher and try again.
- Hold the panel against the obstruction.
- Measure the gap at both corners.
- Shift the mark and recut only if necessary.
Selecting, Maintaining, and Maximizing Your Notcher
Key Specifications to Compare When Buying
The real cost of a poorly chosen notcher isn’t the machine itself, it is the hours lost wrestling with misaligned cleats and the expense of scrapped IBR offcuts. Before you part with your cash, scrutinise the throat depth, which dictates how far from the sheet edge you can cut, and the blade clearance tolerance if you expect consistent results from a manual unit. Comparing specifications should feel less like reading a dictionary and more like matching tools to your specific application, which means considering the sheer volume of work and the operator’s patience. A machine with replaceable blades is a wise purchase, but one that requires a spanner, a hex key, and a strongly worded prayer to change over is a nightmare you can avoid.
– Consider the blade material; high-speed steel holds an edge longer than carbon steel
– Check the shear angle and how it affects the burr on the Galv layer
– Verify the frame’s rigidity so you aren’t flexing the cut line on a 0.55mm profile
Once you have settled on your new roof sheet notcher, the real challenge begins. Ignore the manufacturer’s lubrication chart at your own peril, as grit from the South African Highveld settles into every pivot point and turns precision into a guessing game. A daily wipe down with a solvent rag and a drop of oil on the slide ways will prolong its life far longer than any gimmick. When the blades finally dull, stop cutting and rotate them if the design allows; pushing a blunt tool into clean metal creates the kind of tear that makes a roofer wince. The mark of a professional is not how fast they cut, but how few adjustments they have to make later.
Safety Features to Look For
When you inspect a roof sheet notcher, watch the safety features first. A blade guard that snaps back fully, a lockout pin, and a base that refuses to slide on wet steel matter more than raw cutting force. A rubber foot prevents ground scars on humid Highveld mornings.
- Automatic returning blade guard
- Two handed trip on bench units
- Lockout pin for blade changes
- Non slip feet or clamping points
Maintaining these systems is as crucial as maintaining the blade. A stiff guard hinge invites operators to bypass it. A roof sheet notcher with a dirty lockout slot is a hazard. The oil that lubricates the slide ways also keeps safety components moving, treat the lubrication chart as a safety document.
Respect fatigue too. A jamming notcher encourages extra force, and force near a shear point costs fingertips. Set the blade gap, rotate blades on schedule, and stop when cuts start wandering.
Routine Cleaning and Lubrication Practices
A roof sheet notcher that gets wiped down after every job will outlast the contractor who owns it. Rust is relentless, especially on the Highveld. Dried mud and steel dust form a grinding paste that eats slide ways faster than a bad morning on the N1.
I keep a rag and a can of light oil next to my machine. Wipe the base, blow out the chip tray, then run oil along the guides. Most notcher failures I have seen were simply dirty slide ways. A jammed roof sheet notcher does not need a new motor, it needs a clean rag.
- Wipe the blade guard and its hinge
- Oil the slide ways before heavy runs
- Remove and clean the chip tray
Lubrication is not a luxury. It is what your notcher needs for the next cut. Neglect it and the machine answers with a wandering blade.
Blade Replacement and Sharpening Tips
No blade lasts forever. A roof sheet notcher will tell you when it is tired: the cut edge turns fuzzy, the motor labours, and the corners start to curl instead of slicing cleanly. I sharpen my blades every few thousand cuts using a fine diamond stone at the factory angle. One direction only, steady pressure, and you remove the burr without creating a weak edge.
Some blades are worth sharpening. Others are not. Thin sheet work wears them slowly, but a single encounter with a stray screw can chip the edge beyond saving. Replace it when that happens, and keep a spare in your toolbox. I look for a few signs before I reach for the stone:
- A ragged or burred edge on the offcut
- Increased force needed on the lever
- Burnishing marks along the cut line
A fresh blade on a roof sheet notcher makes accurate work of galvanised and Chromadek sheets. Sharpening is cheap, but knowing when to stop is just as important.
Troubleshooting Common Notching Issues
Every blurred notch costs you precious minutes on the roof. The roof sheet notcher rarely fails without warning, but you discover that only after the third misaligned panel. Drifting cuts usually mean the worktable has shifted, not the blade. Check the datum points before you reach for the spanner. Motor labours under the load, and you assume the worst, yet a simple deburring of the guide rails often restores the rhythm.
– Verify the sheet sits flat against the back gauge
– Confirm the pivot pin has no sideways play
– Test the return spring for a lazy snap back
Thin Chromadek can warp if the hold-down clamps are not square. The cut line starts clean, then wanders mid stroke. That is a material handling problem, not a machine fault. Adjust the sheet position and the roof sheet notcher delivers another thousand accurate cuts. Treat the odd squeak as a conversation, not a crisis. Listen, and you will hear what needs tightening. The tool talks, you just have to be willing to translate its language.
Extending the Lifespan of Your Equipment
A roof sheet notcher selected for long service starts with the castings and pivot bushings. A solid machine rarely fails early. In coastal South Africa, stainless fasteners resist salt air better than mild steel.
The lifespan depends on alignment habits. A back gauge calibrated every Monday morning prevents drift-related fatigue. Rotating between two or three notchers in high volume workshops reduces wear. Grouping similar profiles into one run cuts setup time.
The most durable setups share common traits:
- Level mounting on a rigid floor
- Breathable covers in dry sheds
- Professional inspections every six months
The machine retains accuracy through consistent geometry. A well chosen example, given steady care, outlives many roofers’ careers.


0 Comments